Prerequisites
Before installing and using this plug-in, your Zen Cart store (version 1.5.7 or later) should be up and running. If you are just getting started with Zen Cart, do not try installing and using the plug-in until your store is working correctly and you understand how to manage it. You must also have an eBay account and an eBay Store. Finally, you will need to apply for and receive access to the eBay APIs through the eBay Developers Program.
- Getting Started with Zen Cart
- Create an eBay Account
- Open an eBay Store
- Join the eBay Developers Program
This plug-in does not change or overwrite any of Zen Cart's core or template files. It does not change any of the Zen Cart database table structures. And it is installed and managed using the Zen Cart Plugin Manager. These things make the installation straightforward with little risk of adversely affecting your online store.
Installation
The first installation step is to download the plug-in's zip file to your local computer or server. The ebayintegration.zip file is an archive containing the code and data files for the eBay Integration for Zen Cart Plug-In. It contains two folders, cron and zc_plugins.
The cron folder contains a standalone script that can be run as a cron job to ensure that the quantities of products in your eBay Store stay in sync with the quantities in your Zen Cart store. How to set up a cron job will be discussed later.
The zc_plugins folder contains the Admin code and data for the plug-in as well as the installer.
Unzip the files from the archive and copy or upload them to the folder where Zen Cart is installed on your server. For example, if your cart is installed on your webserver under /public_html/zencart, then copy the folders to that folder. The directory structure for Zen Cart on your server should look something like:
- admin
- cache
- cron
- docs
- download
- editors
- extras
- images
- includes
- logs
- media
- min
- plugins
- pub
- zc_plugins
Your store's directory structure won't be exactly as listed above. Your admin folder will have a different name and there will be other files and folders. But the important thing is that the new cron folder is there in the same folder as your admin folder and the other top-level Zen Cart folders. If you look into the zc_plugins folder, you'll see the new ebayintegration folder.
Log into to the Admin section of your Zen Cart store. Select "Plugin Manager" from the "Modules" menu.
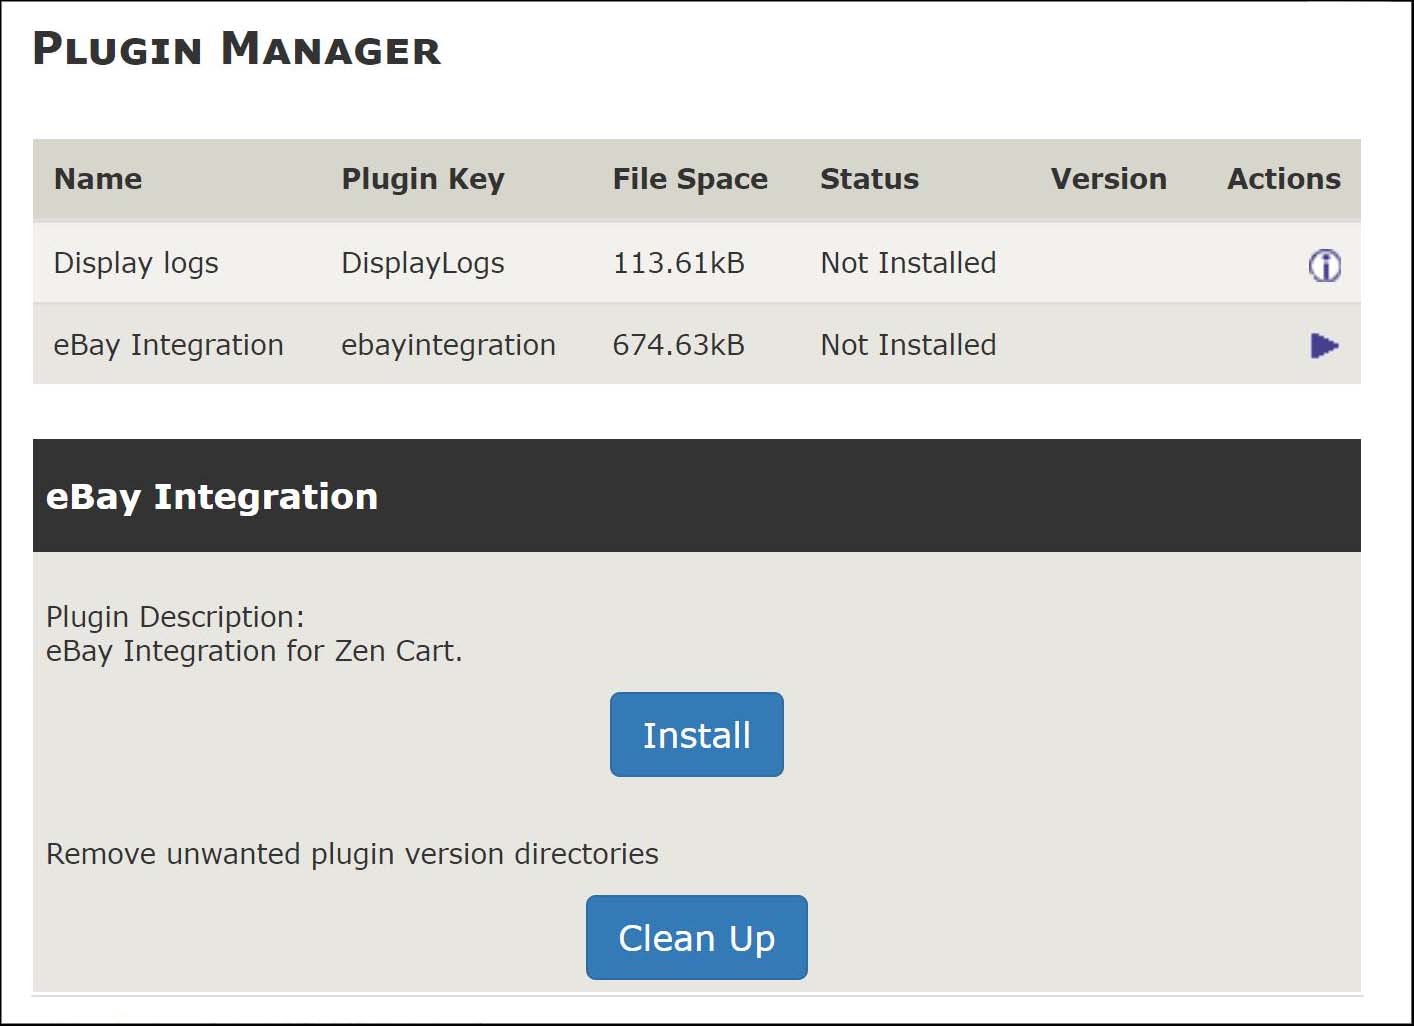
The eBay Integration for Zen Cart plug-in should be listed as an available plug-in. Select "eBay Integration" from the list then click the Install button. Zen Cart will display another Install button which you should click.
The plug-in will now be shown as installed and enabled in the Plugin Manager.

An "eBay Integration" option is now available in the Tools menu.

Initial Configuration
Select eBay Integration from the Tools menu. The plug-in's Dashboard tab is displayed.
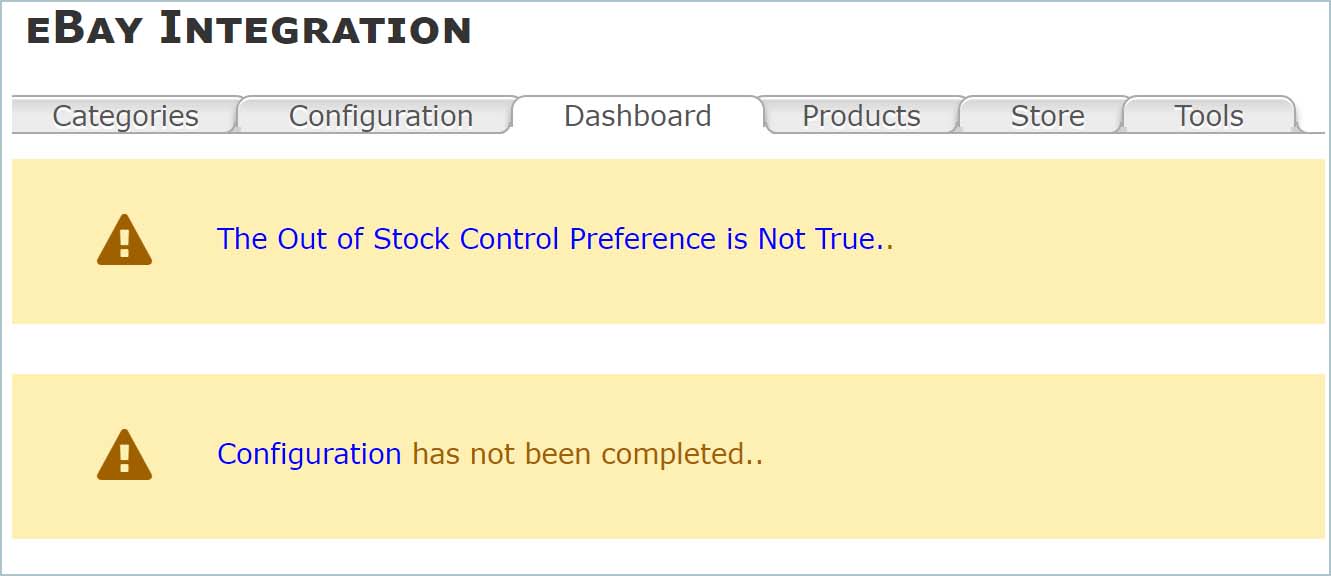
Two warnings are displayed. For now, you can ignore the warning that the "Out of Stock Control Preferences is Not True." Click the Configuration link or tab holder to open the Configuration tab.
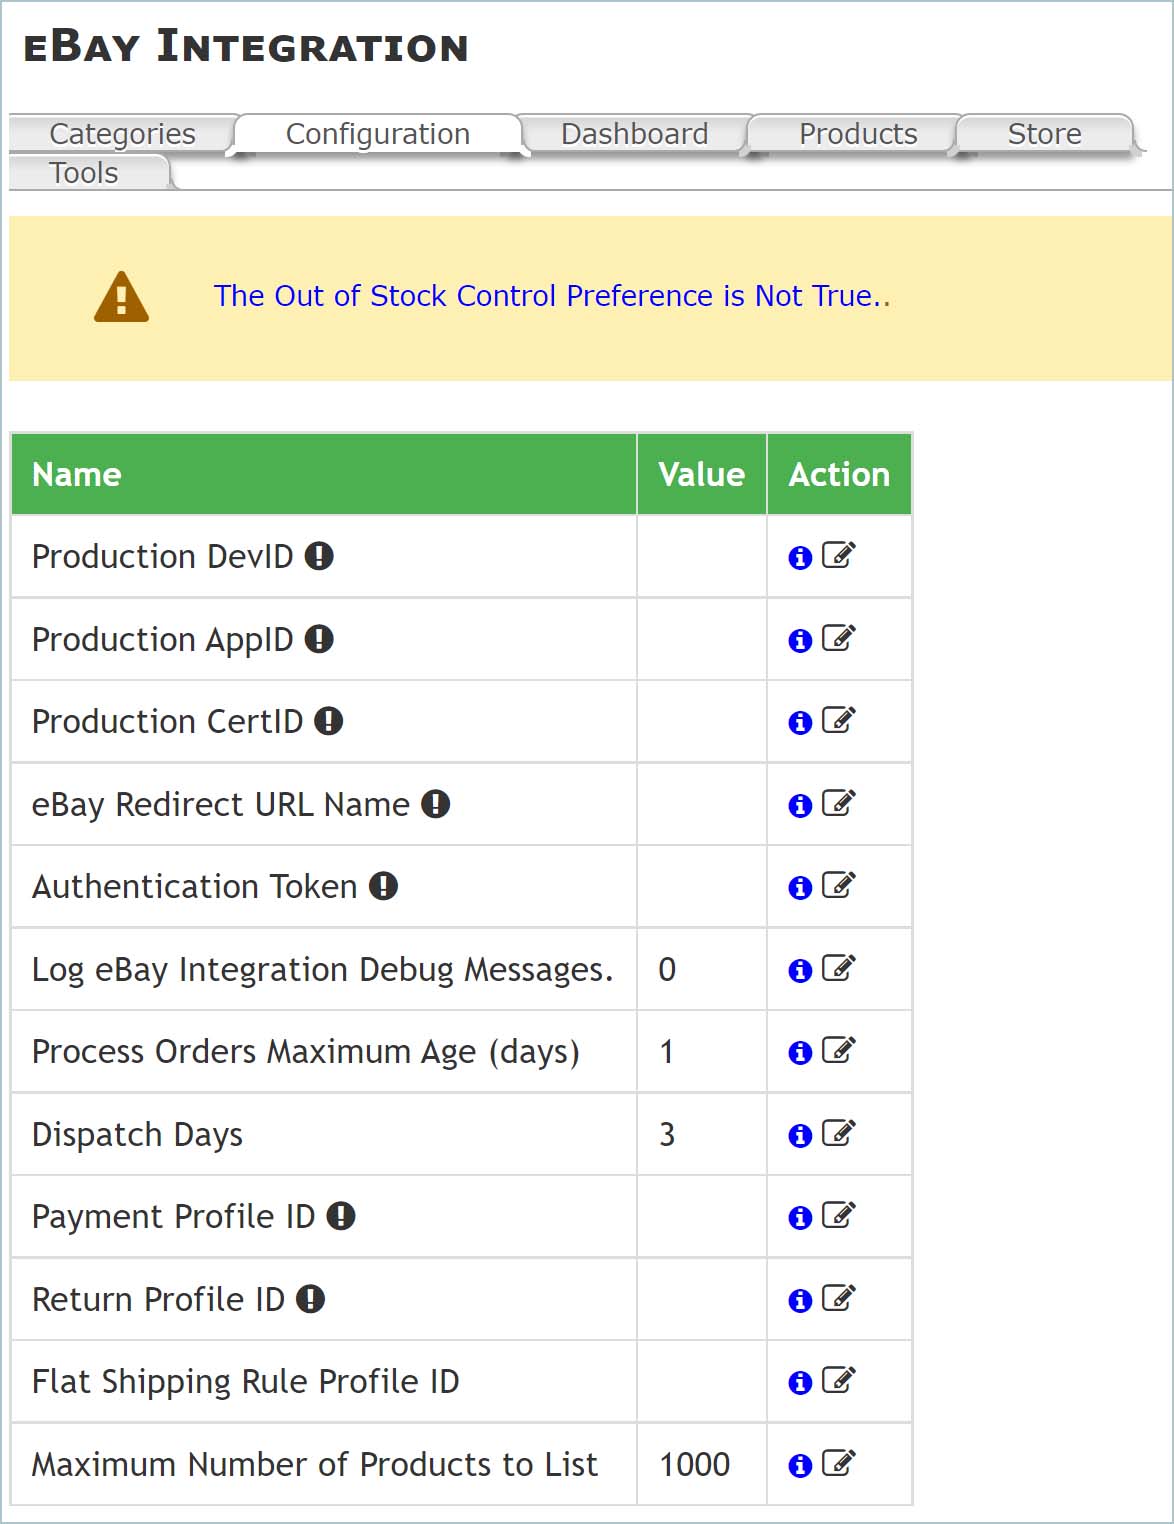
The configuration options marked with an exclamation mark are required. Hover the mouse pointer over the option's name to see a short description or click the information icon for a longer description.
Click the edit button to set or change the value of a configuration option.
Set the Dev ID, App ID, and Cert ID are the values for the Developers Keys assigned to you by the eBay Developers Program. The eBay Redirect URL Name is set up and retrieved on the eBay Developers Program website in the same place where you obtain your Developers Keys.
You do not need to manually create and enter an Authentication Token. Instead, enter the Dev ID, App ID, Cert ID, and eBay Redirect URL Name then execute the Authorize Access Tool on the Tools tab of the plug-in. Click the button to log into your eBay account and give access to the plug-in. Once you have done this, the Authentication Token will be valid for 18 months.
A Payment Profile ID is required. Your eBay Payment Policy specifies how customers will pay for your eBay items.
Set up your Payment Polices on eBay's site. Once logged into eBay, select Account Settings from the drop-down beside your name in the upper-right corner of the page. Then click the Business Policies link. Select Create then select Payment. Create and save the Payment policy.
When the list of policies is displayed, click the title of the Payment Policy that you wish to use for the listings you create using the plug-in. When the edit page is displayed, the Payment Profile ID will be displayed in your browser's address bar. Look for "profileId=xxxxxxxxxxxx" in the URL. The number is the Payment Profile ID to enter into the Configuration Options of the plug-in.
A Return Profile ID is required. Your eBay Return Policy specifies return details for your eBay items.
Set up your Return Polices on eBay's site. Once logged into eBay, select Account Settings from the drop-down beside your name in the upper-right corner of the page. Then click the Business Policies link. Select Create then select Return. Create and save the Return policy.
When the list of policies is displayed, click the title of Return Policy that you wish to use for the listings you create using the plug-in. When the edit page is displayed, the Return Profile ID will be displayed in your browser's address bar. Look for "profileId=xxxxxxxxxxxx" in the URL. The number is the Return Profile ID to enter into the Configuration Options of the plug-in.
Handle eBay Account Deletion Notifications
In order to use the eBay API, eBay requires you to subscribe to Account Deletion Notifications.
Using a text editor, open the ebayaccountdeletion.php file and change the following two lines:
define('EBAY_ACCOUNT_DELETION_TOKEN', 'thejonrocketcomverificationtoken');
define('EBAY_ACCOUNT_DELETION_ENDPOINT', 'https://jonrocket.com/shop/cron/ebayaccountdeletion.php');
Change the value for EBAY_ACCOUNT_DELETION_TOKEN to something unique for your site (change "thejonrocketcom" to a short name of your site).
Change the value of EBAY_ACCOUNT_DELETION_ENDPOINT to the URL of ebayaccountdeletion.php on your site.
Sign into your developer account.
Go to the Application Keys page.
Click the Notifications link adjacent to your App ID. You will be taken to the Alerts and Notifications page shown below:
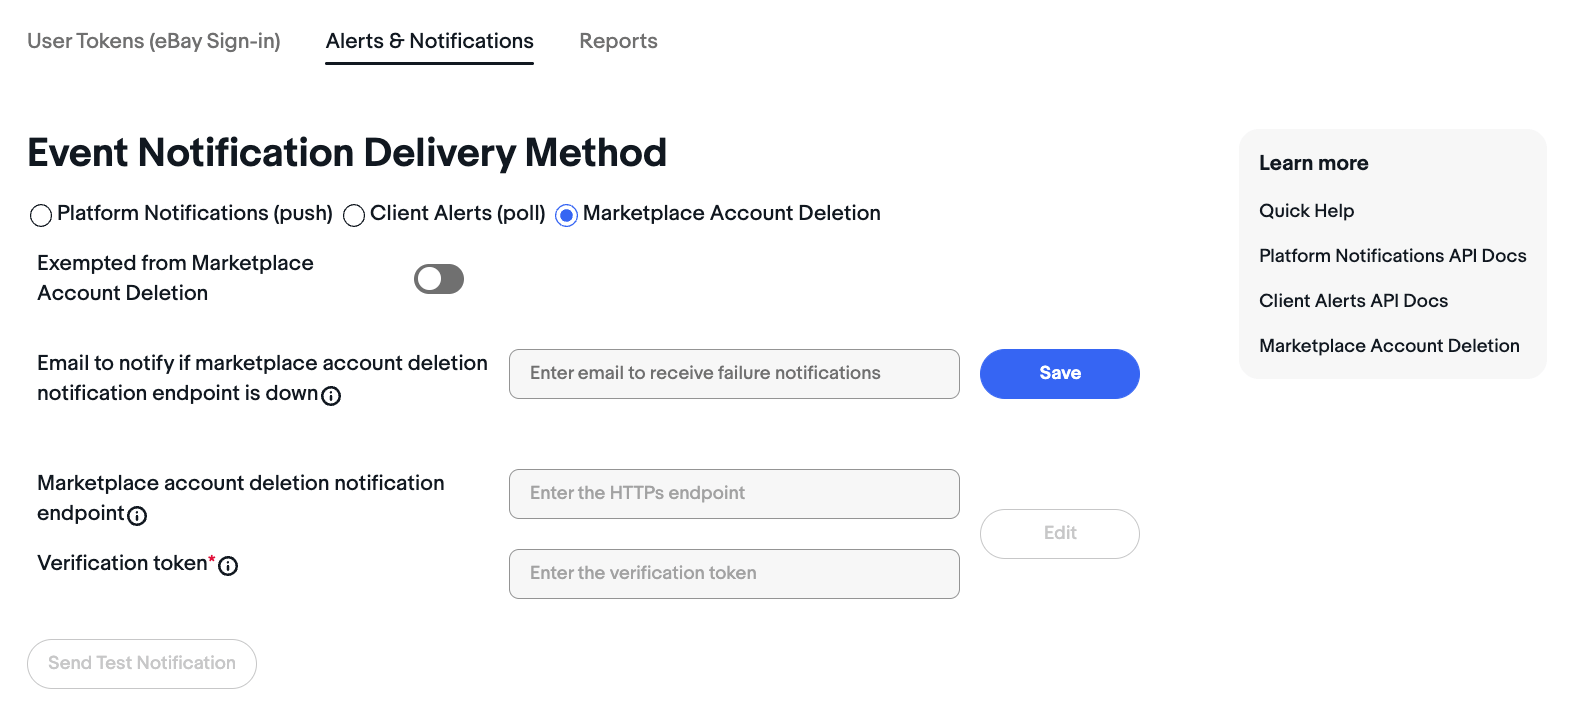
On the Alerts and Notifications page, select the Marketplace Account Deletion radio button under the Event Notification Delivery Method section.
Enter your email address. The email address is required but will only be used to alert you if the specified Notification Endpoint URL is not reachable/not acknowledging notifications properly. Once you have input an email address, click the adjacent Save button.
Set the Notification Endpoint URL for receiving notifications. This is the URL of the ebayaccountdeletion.php script on your site.
In the Verification token field, provide the 32 to 80-character verification token that you set in the ebayaccountdeletion.php file when you edited it.
Once you have set your Notification Endpoint URL and Verification token value, click the adjacent Save button. As long as the URL and Verification token value are valid and accepted by eBay, clicking the Save button will also trigger the validation process, with the first step being eBay sending a challenge code to the endpoint. If your endpoint successfully responds to eBay's challenge code, your Notification Endpoint URL and Verification token value will be successfully saved. If an issue arises, you may have to troubleshoot your endpoint and how it is receiving and replying back to eBay's challenge code.
After you have successfully subscribed to eBay marketplace account deletion/closure notifications, send a test notification to this URL by clicking the Send Test Notification button.
Set Up cron Job
The plug-in includes a PHP script which can be run as a cron job. This script ensures that all eBay orders are processed by the plug-in so that your Zen Cart and eBay stores are synchronized. The script is located in the cron folder and is named ebaycron.php.
There are many ways to run the ebaycron.php PHP script as a cron job, On Linux systems, one way is to add something like the following to your system's crontab:
*/30 * * * * curl https://yourstore/cron/ebaycron.php > /dev/null 2>&1
Replace yourstore with the domain and path to your store's site.
It is not absolutely necessary to set up the cron job, but it is recommended that you do so.
Set Up eBay Notifications
When a sale is made on eBay, eBay needs to inform the plug-in of the sale. This is done by a notification. To set up notifications, run the Event Notification tool on the Tools tab. Enter the URL of the ebaycron.php in the cron folder of your Zen Cart store. The URL to enter will be something like:
https://yourstore/cron/ebaycron.php
Replace yourstore with the domain and path to your store's site.
Click the Submit button to set the notification URL.
Configure Shipping Services
Use the Shipping Services tool on the Tools tab to limit the shipping services that will be available when you choose the shipping service for a product. Select shipping service types to hide by adding a check to the ones you won't use.
eBay Setup
In addition to creating Payment and Return Policies (see above), you need to set up a few other things in eBay. Log into your eBay site.
For the eBay Integration for Zen Cart Plug-in to function properly, the "Out Of Stock" preference in eBay should be enabled. To enable the preference, log into eBay.
Select Account Settings from the drop-down menu under your user name in the upper left corner of the eBay web page. Under Selling click the Selling Preferences link.
Beside the Multi-quantity listings label, turn on the Listings stay active when you're out of stock option.
If you do not already have an eBay store, you will need to create one and create store categories for your products. The hierarchy of categories in eBay doesn't have to match your store's categories, but you'll want to make sure that you have appropriate categories for the products that you wish to list on eBay.
Connecting Zen Cart and eBay Store Categories
To connect categories in your Zen Cart store to categories in your eBay store, open the Categories Tab of the plug-in.

Click on a Zen Cart store category to display the children of the category or, if there are no children, a control for selecting the eBay store category to map to the Zen Cart store category will be displayed. The selected eBay store category will be used as the default eBay store category when listing products in the Zen Cart store category on eBay.
Managing eBay Store Categories
Open the Store Tab to display the categories you created in your eBay Store on eBay's site.
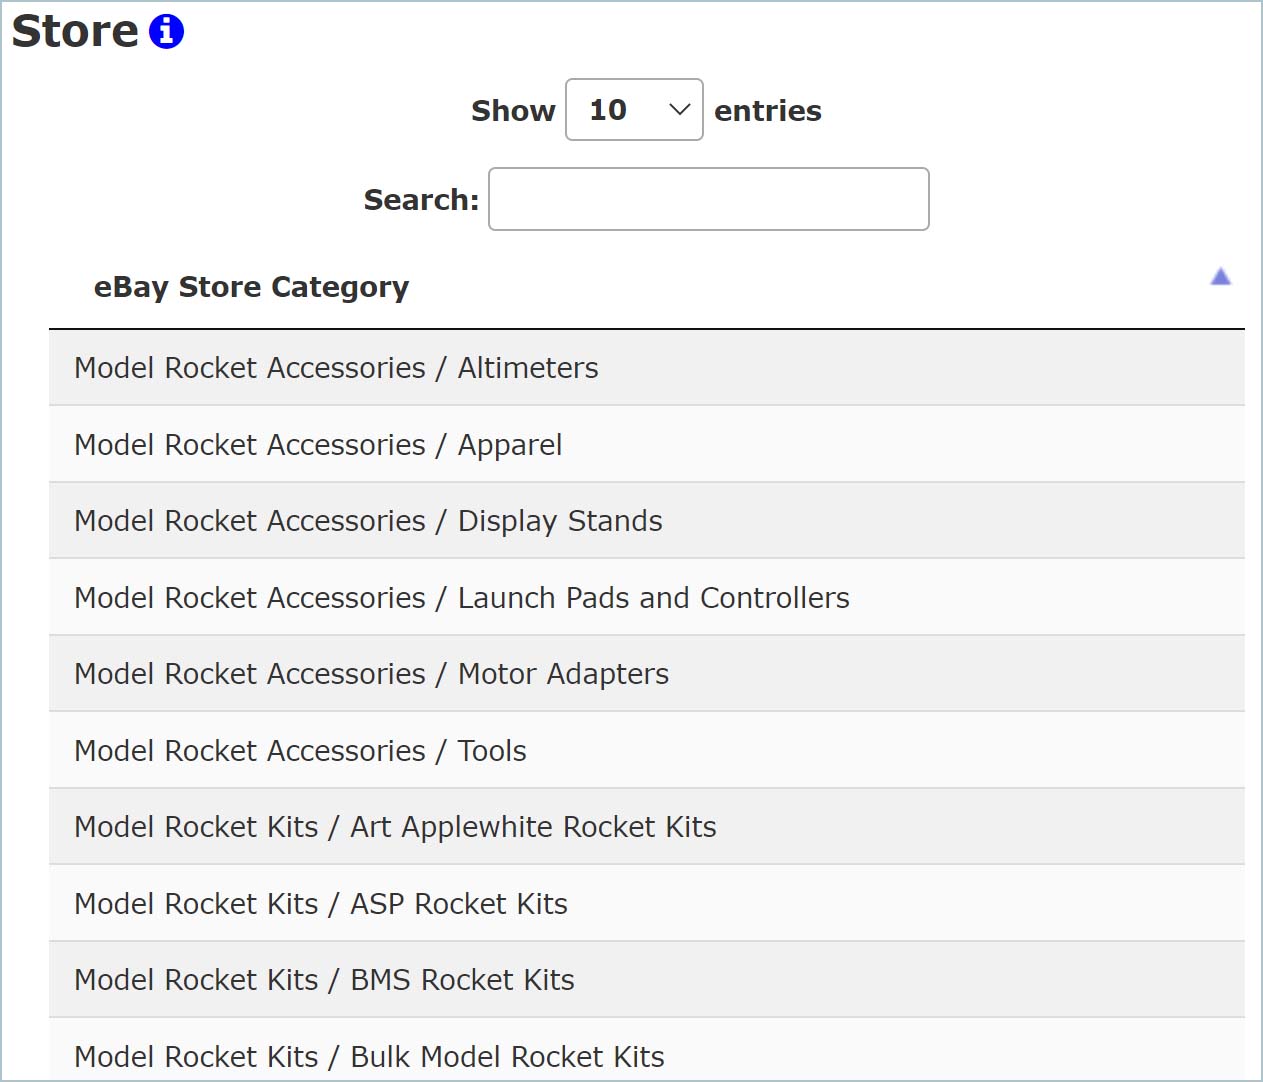
Click on the name of an eBay Store category name to edit the Extra Product Description and eBay Category ID for the eBay Story category. The Extra Product Description defines optional HTML to add to the end of product descriptions of products added to the eBay Store category. The eBay Category ID defines the default eBay Category to use for products added to the eBay Store category.
List Products on eBay
Open the Products tab to view the products in your store. Use the filters at the top of the page to limit the number of products displayed.
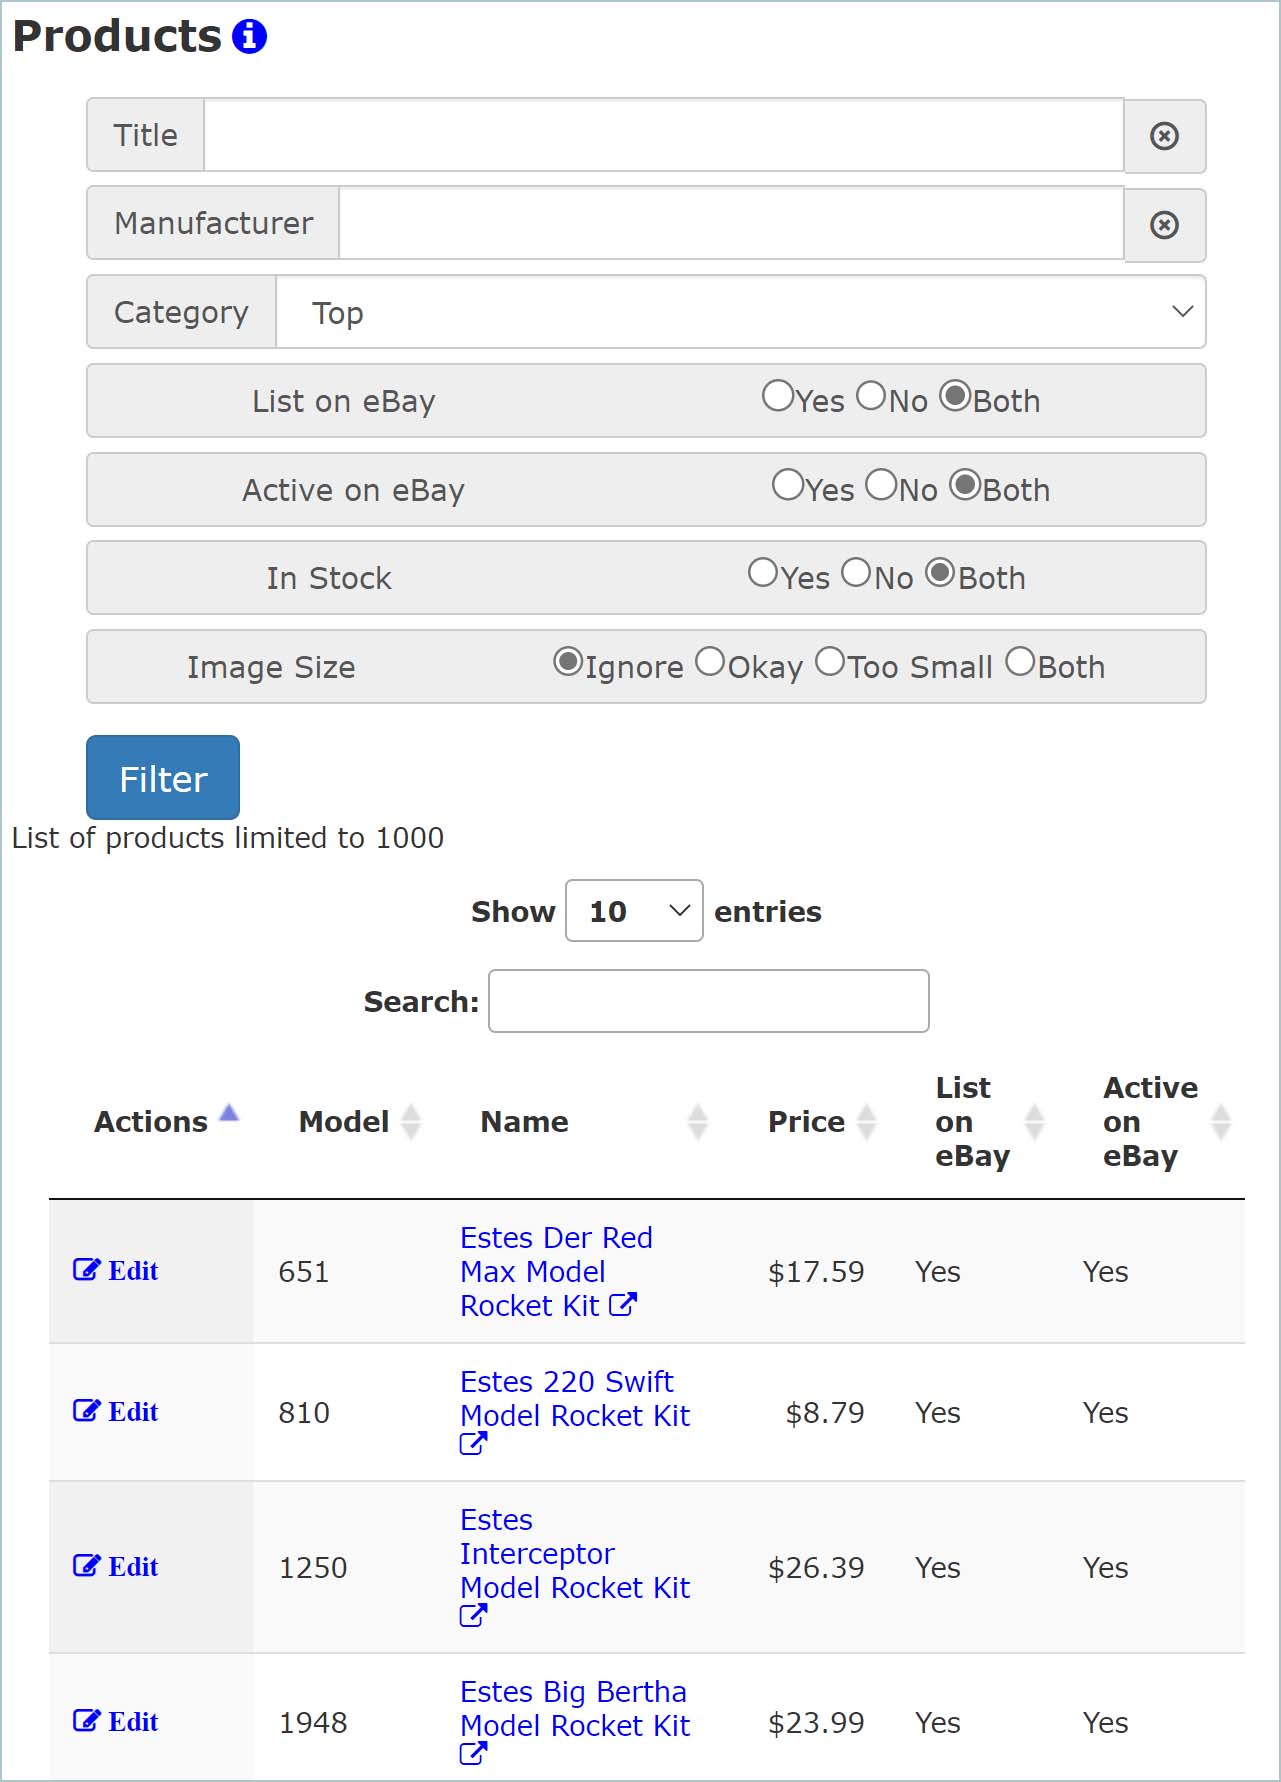
After you click a product's name information about the product will be displayed.
If the product is listed on eBay, a link will be provided to the listing.
If the product is not listed on eBay, then a list of attributes will be displayed.

The attributes will be used to list the product on eBay when you click the Add to eBay button.
The first attribute, Messages, lists any issues with the attributes or errors encountered when attempting to create a listing for the product on eBay. If there are messages available to read, the number of messages will be displayed. Click the Messages panel to expand the panel and view the messages.
Click on any attribute's panel to expand the panel and view the attribute in more detail. Click the Edit button to change the value of an attribute.
The List on eBay attribute must be set to "Yes" or an error will be generated if you attempt to add the product to eBay.
The eBay Title attribute set the title for the item when listed on eBay. It defaults to the product's manufacturer and name.
The Product Listing Details attribute allows you to specify identifiers for the product such as the Brand, Model, and UPC. These are required in some eBay categories. The Brand and Model values default to the Manufacturer and Model from the Zen Cart product.
The Price attribute sets the price of the item on eBay. It defaults to the price of the Zen Cart product.
The eBay Shipping attribute sets the shipping service and costs to ship the item - the cost for the first item and the extra cost for each additional item.
The eBay Store Category sets the category on the eBay store where the product will be listed. It defaults to the eBay Store Category associated with the Zen Cart store category on the Categories tab.
The eBay Category sets the eBay category for the product when it is listed. It defaults to the category associated with the eBay Store category on the Store tab.
The eBay Image attribute allows you to specify an image to use for the eBay listing instead of the store's product image,
The eBay Description attribute sets the description for the product on eBay. It defaults to the product's description from the Zen Cart store. The Extra Product Text defined for the eBay Store Category will be added to the description on eBay.
The eBay Condition attribute sets the condition of the product on eBay. It defaults to "new."
The Item Specifics attribute sets attributes describing the product such as the Brand and Type. Some specific item specifics are required in some eBay categories.
The Handling Time attribute sets the maximum number of days it will take you to dispatch the item. The default value is set by the Dispatch Days configuration option.
The Store Reserve sets the quantity of items to hold in reserve in your Zen Cart store. This quantity will be subtracted from the Zen Cart store quantity when setting the eBay quantity. For example, if Store Reserve is set to 2, the eBay quantity will always be two less than the Zen Cart store quantity.
Once you have reviewed and set the eBay attributes, click the Add to eBay button to add the product to eBay. If any errors are encountered, they will be displayed in the Messages attribute. Otherwise, a link to the product on eBay will be displayed.
It is recommended that you view the new eBay listing after it is created to ensure that it is correct.
Managing eBay Listings
After items are listed on eBay, the plug-in will keep the quantities on eBay and in your Zen Cart in-sync. When items are sold on eBay, the quantity in the Zen Cart store will be reduced by the number of items sold. When products are sold from your Zen Cart store, or you change the quantity of a product in your Zen Cart store, the quantity listed on eBay will be updated. If you edit the listing on eBay and change the quantity, however, the Zen Cart store quantity will not be affected.
Do not change the quantity of items in listings on eBay, You can, however, edit your listings through the eBay web site to change other things such as shipping options or the description.
If you need to make changes to multiple eBay listings or Zen Cart store products, you can use the Batch Update tool.
Uninstall
To uninstall the plug-in, disable the cron job on your server if you created one. Disable the eBay notification by entering an empty value for the URL using the Event Notification tool. Disable the plug-in in the Zen Cart plug-in. Remove the cron and zc-plugins/ebayintegration folders. Remove the *ebay_* database tables. Remove the file auto.ebay_integration.php from the includes/classes/observers folder.